|
Review of Ulead DVD MovieFactory 6 Plus (part 2
of 2)
Last time I gave you an overview of DVD MovieFactory 6 Plus
and discussed some of it's programs and capabilities, mainly
dealing with DVD copying and burning features. This time I will
get into importing video, editing video, and creating a DVD with
a professional looking menu.
As a way of easing into video authoring I figured creating
a simple video slideshow using several JPEGs from my digital
camera would be easy. I started by going to the DVD MovieFactory
Launcher (see a graphic of the Launcher in part 1 of this review
article) and selecting "Video/Slideshow Disc" on the
left side. When I moused over to "New Slideshow Project"
on the right side, the information line at the bottom of the
Launcher said "Make new slideshow disc." I clicked
the "New Slideshow Project" button and was transported
to the DVD MovieFactory host program screen "Select source
and import (Step:1/3)."
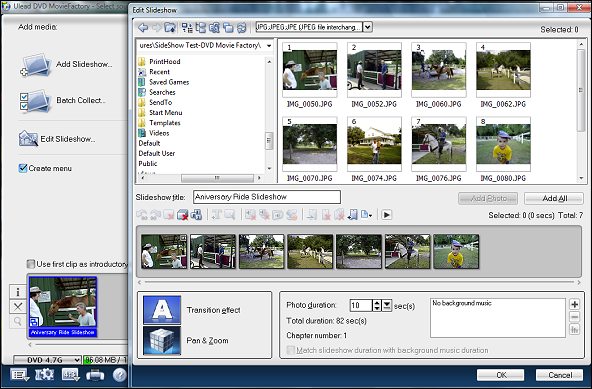
I clicked the "Add Slideshow" button to create
a slideshow and it took me to the Edit Slideshow screen which
allowed me to pick JPEG photos from my hard drive. A variety
of formats are supported including JPEG, JPEG 2000, PNG, GIF,
BMP, etc. On this screen I could select Photo duration, Transition
effect, Pan & Zoom, and also add background music. The program
has over 20 short music clips in MPA (MPEG Audio) format included
but you can use other formats (CDA, Mp3, Ogg, Wav, WMA). There
are also options for things like an "Auto fade-out"
on the music and "Matching slideshow duration with background
music duration." For the Pan & Zoom you can choose "Single
Effect" or "Random." If you choose "Single
Effect" the same effect is applied to each photo. You have
a choice of 18 Pan & Zoom Single Effects. "Random"
gives a different effect applied randomly to each photo. You
can choose from 8 Random combinations. If you really want to
get creative you can select "Custom" and design precisely
how you want the Pan & Zoom to take place. Transition Effect
has a variety of effect selections in each of 6 different categories:
Build, Clock, FX, Push, Slide, Wipe. The seventh category is
"Random." Again the same transition will be applied
between all photos in your slideshow unless you select "Random."
There are 6 Random combinations.
If all the above is not enough you can add sound annotations
to your selected photos and do a custom or quick-fix on photos
that might need touching up. You can correct things like Exposure,
Color Cast, Color Saturation, Focus and also Beautify Skin. For
further creativeness you can decorate photos with Props (Clip
Art) and/or text. You can spend hours letting your creative juices
flow with all that is offered.
At anytime you can click the "Preview" button to
see how the finished slideshow plays. If you are not happy just
keep changing things until you get a combination you like. Then
click the "OK" button and you are back to the "Step:1/3"
screen where you can add more media, go back to editing, or move
on to the next step which is creating a menu. At this point you
could also right click the slideshow image in the Media Clip
sequence list and elect to export your creation as an MPEG video.
That's all I intend to discuss about slideshows as I'll get
into creating a DVD menu below when I discuss video. The menu
creation process is the same for a slideshow or video.
I next decided to see how the importing of video would work.
I recorded three 30 second video clips from three different cable
TV channels at SP speed on a DVD+RW disc using my stand-alone
Lite-On LVW-5005 DVD Recorder. I then placed the DVD+RW in my
computer's DVD drive, brought up the DVD MovieFactory Launcher
and selected "Import/Capture" and "Import from
DVD." Up came a "Select a DVD Title" screen listing
my DVD drive and buttons for "Import DVD Folder" (from
a folder on my hard drive) and "Import" (from the disc
in the DVD drive). I clicked "Import" and after an
"Import DVD Initialization" screen (where it parsed
the DVD+RW's content) I arrived at an "Import DVD"
screen which displayed a tree formation of the DVD+RW's content
with a heading of Title and sub-heading of Chapter.
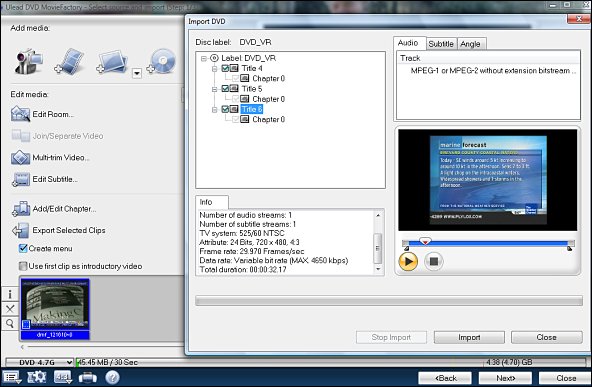
By check marking the box next to each Title I could preview the
video clip and trim (edit out) if desired the front and back
ends prior to import. There is also an Info section that tells
you all the details on each clip such as Number of audio streams,
TV system, Frame rate, Data rate, Total duration, etc. I check
marked all three clips and clicked the "Import" button.
The clips were imported and I was now in the DVD MovieFactory
host program on a screen called "Select source and import
(Step:1/3)" where my 3 clips were displayed in a Media Clip
sequence list. From here I could change the sequence of the clips,
delete a clip, add more clips from disc or hard drive by going
to "Add Media" and clicking the Disc icon, or go to
the Edit Room for further editing. I could also export the clips
or create a menu.
I clicked on "Export Selected Clips" and a wide
range of options (which at first are not very clear) came up.
I selected "SP 4:3" and a "Save Video File"
screen came up informing me that I was saving my selected clip
as an MPEG file at 24 bits, 720x480, 29.97 fps, DVD-NTSC, 4:3,
with a Variable Video data rate (Max 2500 kbps) and Audio data
rate of 224 kbps. Wow, talk about information overload! All I
know is I saved the clip and it played on my computer. If you
are so inclined you can even create new templates by customizing
the save option templates to your specifications. This is probably
a good time to mention that DVD MovieFactory works with both
4:3 and 16:9 widescreen video.
Last time, in part 1 of this review article, I mentioned that
the Ulead web site has a number of tutorials to provide additional
information and clarification of the program. One of these tutorials
I found helpful was "Editing discs created from set-top
recorders (DVD Video Recording)" at http://www.ulead.com/learning/dmf/dmf4_06_1.htm.
Help and information is also available on the DVD MovieFactory
Forum at http://phpbb.ulead.com.tw/EN/viewforum.php?f=2.
After testing my exported video clip I went back to the three
clips that were still in the Media Clip sequence list on the
"Step:1/3" screen and created a DVD menu in order to
get familiar with that process. I'll go into detail on DVD menu
creation next, when I discuss importing camcorder video. I'll
go through the entire process from video import to finished video
on DVD, complete with menu.
I was now ready for the big test--importing video from my
Cannon Optura 20 Digital Video Camcorder into DVD MovieFactory.
It was also a test of my new HP computer's Firewire capability
as I had not yet tried it. I connected the camcorder via a 1394
Firewire cable to the computer and the computer instantly recognized
it. Now I could have gone to the DVD MovieFactory Launcher and
selected "Import/Capture" and "Capture from Devices."
This would have brought me to the now familiar "Select source
and import (Step1/3)" screen in the host program. But this
time I decided to go directly to the DVD MovieFactory host program.
On the initial screen I selected "Start project," "New
project," and "Output disc type DVD." I clicked
the "Next" button and there I was at the "Select
source and import (Step:1/3)" screen. I clicked on the Camcorder
icon in the Add media section for "Capture videos from a
video device." Up came a "Capture Video" screen.
With my camcorder in VCR Play mode I could set the time duration
for a capture or start and stop the capture as desired. After
completing my video captures I clicked "OK" and was
back to the "Step 1/3" screen with my captured clips
showing in the Media Clip sequence list.
I had imported several Family Newsreel video clips and could
now go into the Edit Room and further refine my project by changing
the clip positions in the sequence, adding titles and/or transitions
(just like with the slideshow), etc. In the Edit Room for video
you can select from 98 effects in 11 transition groups. It should
be noted that you need at least two video clips to add a transition.
This is logical as you want to transition from one clip to another.
In the Storyboard mode the transition goes between the two clips.
At first I thought this might be a problem if you wanted to fade-in
from black to a single clip. It is not a problem. DVD MovieFactory
has made provisions for this in the Edit Room with video fade-in
and fade-out buttons. In fact you can pick the color you want
to fade the video into or out of and set the time duration of
the fade. Among the many other things you can do in the Edit
Room are adjust audio volume, fade-in and/or fade-out the audio,
and mute the audio. It seems each time I use the program I discover
more features I did not realize were there. For example, I found
on the Edit Room Timeline I could combine a photo slideshow,
single photos, and video clips (with transitions between as desired)
into a seamless video. This is an amazingly versatile program!
I did, however, find that DVD MovieFactory does have some
limitations with respect to integrated video/audio (or maybe
I have just not found a proper solution within the program).
My Panasonic FX30 Digital Camera records video in the Apple MOV
format so I imported a recorded video from its Secure Digital
card. The video with it's integrated audio played fine in DVD
MovieFactory as long as I did not try to edit it. When I took
it into the Edit Room I could edit the video but then the audio
became a static like noise. The audio track was useless. All
I could do was mute it and add a voice annotation or music track
to go with the video. I suppose a way around this "no audio"
problem might be to first play the video on the Digital Camera
and record it's analog video/audio output on a my stand-alone
DVD Recorder. This would put everything in the proper MPEG format
for importing into DVD MovieFactory.
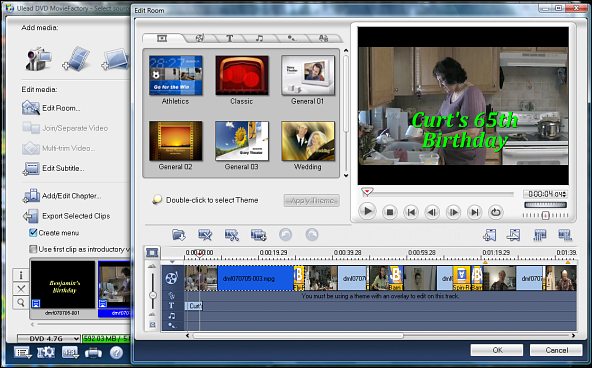
As an option, to help fancy-up your video, DVD MovieFactory
includes a number of Themes that will take your video clip and
add opening, titling, and transition effects along with background
music to enhance your video and give it that professional look.
Once the theme is added you can go back in and customize things
like titles to make it personal.
With DVD MovieFactory you can edit very precisely down to
the frame. It also has a unique feature called Multi-trim which
I really 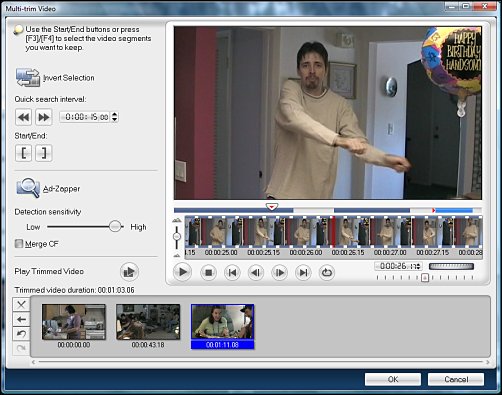 liked.
With Multi-trim you can take a video clip and instead of just
being able to trim the front and back ends off, you can go into
the middle of a clip and extract multiple segments and then join
the extracted segments together. The Multi-trim screen also has
an Ad-Zapper which would be useful if you have recorded a favorite
TV show that you wanted to save on DVD. The Ad-Zapper claims
to remove the commercials. I did not try it so I can't speak
to its effectiveness. liked.
With Multi-trim you can take a video clip and instead of just
being able to trim the front and back ends off, you can go into
the middle of a clip and extract multiple segments and then join
the extracted segments together. The Multi-trim screen also has
an Ad-Zapper which would be useful if you have recorded a favorite
TV show that you wanted to save on DVD. The Ad-Zapper claims
to remove the commercials. I did not try it so I can't speak
to its effectiveness.
Once I had completed all my editing I had five family newsreel
video sequences ready for creation of a menu. On the "Step
1/3" screen "Create menu" was checked so I clicked
the "Next" button. I was now at the "Select a
template to create menu (Step: 2/3)" screen.
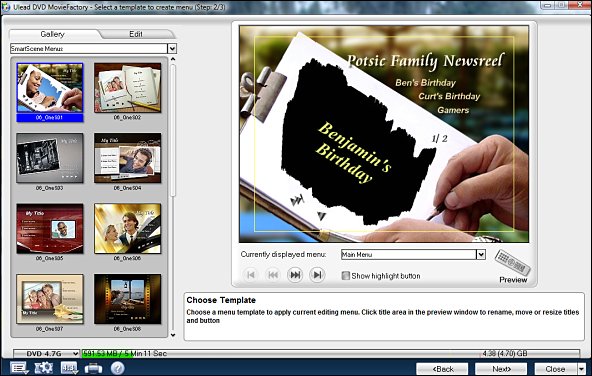
From here you choose a menu template to apply to your edited
video clips. DVD MovieFactory has a Gallery of menu templates
to choose from with categories of Text, Thumbnail, and SmartScene.
Ulead says there are over 100 professional Standard Definition
and High Definition menu templates. The templates come with preselected
background music and colorful motion backgrounds with animated
titles. The Text Menu templates are the simplest. They show titles
only as text. The Thumbnail Menu templates show your video clip
titles as both text and thumbnail video previews (up to 30 seconds).
The SmartScene Menu templates are the most elaborate. In addition
to the animation and motion of the titles and background with
navigation buttons or decorative objects they provide a larger
than thumbnail video preview of each title when your mouse over
the title or click it with your remote control. Clicking the
title a second time with your remote control starts the actual
video.
In working with menus, DVD MovieFactory gives you complete
freedom in resizing, renaming, and moving of the various titles
and buttons on the menu template. If you want to customize even
further you can click the "Edit" tab which opens up
even more possibilities such as selecting the Motion Menu background
music, background image/video, and time duration. You can also
change the Moving path (menu transition in and out) and click
a "Customize Layout" button for even more variety.
The menu creative possibilities appear to be infinite.
I should mention that anywhere along the way of creating your
DVD you can stop and save your work as a project. This allows
you to come back at a later date and resume your creative endeavors.
To insure you are satisfied with your customized menu you
can click on a "Preview" button which allows you to
see what the finished menu will look like before you actually
burn it to a DVD media blank disc.

If anything does not meet with your approval simply go back and
keep changing things until you are satisfied.
When you are satisfied with your menu design it's time to
click the "Next" button which takes you to "Step:
3/3" where you label (name) your disc, select the recording
format, and press the "Burn" button to create a disc.
However, pressing the "Burn" button does not immediately
start the disc burn. It starts the process which first requires
the data conversion of the menu template. I found that the converting
of data to my menu customization from a SmartScene menu template
took approximately 40 minutes before the actual disc burning
began. The length of actual disc burn time will vary with the
complexity of the menu, amount of video data to be burned on
to the disc, and recorder burn speed.
If you want to know more about DVD MovieFactory 6 Plus
go to the Ulead website and download the features PDF
at http://www.ulead.com/dmf/features.htm.
While there you can also view the "Flash Tour" Tutorial
and even download a Free Trial version of the program (237MB)
valid for 30 days.
So what do I think of DVD MovieFactory? It's a very comprehensive
program with many features, some of which I did not expect would
be included, and it works quite well. I was very impressed with
the professional looking DVDs I created. As to it being "easy"
the answer is yes, once you have become familiar with the program.
Learning the program means reading the manuals in great detail
as there are a vast amount of features and capabilities. Don't
expect to be quickly turning out DVDs. The actual DVD creation
process can be very time consuming due to the subjective nature
of the editing process. With such a feature rich program I found
myself spending hours in the Edit Room tweaking my Family Newsreel
videos and then more time creating a personalized DVD menu. It
reminded me of years gone by when I would spent days editing
the old 8mm film.
Note: Web Master Wanderings
articles contain links to external web sites. Web addresses are
constantly changing. There is no guarantee that the information
links provided in this article will remain unbroken or up-to-date
beyond the date that this article is originally published. |